 Twitter
 Facebook
 RSS
RSS Call 928-202-9155
- Details
- Category: Structured Water Unit Articles
HOME PLUMBING FOR STRUCTURED WATER UNITS
To Download Installation Sheets Please Go Here
STEP BY STEP
IMPORTANT
All illustrations in this instruction show typical plumbing methods; actual installations must be adapted to individual requirements and regional codes. The author has made every effort to ensure accuracy and reliability of the information, instructions, and directions. However, neither the author, this website nor the manufacturer will accept responsibility for misinterpretation for the directions or human error.
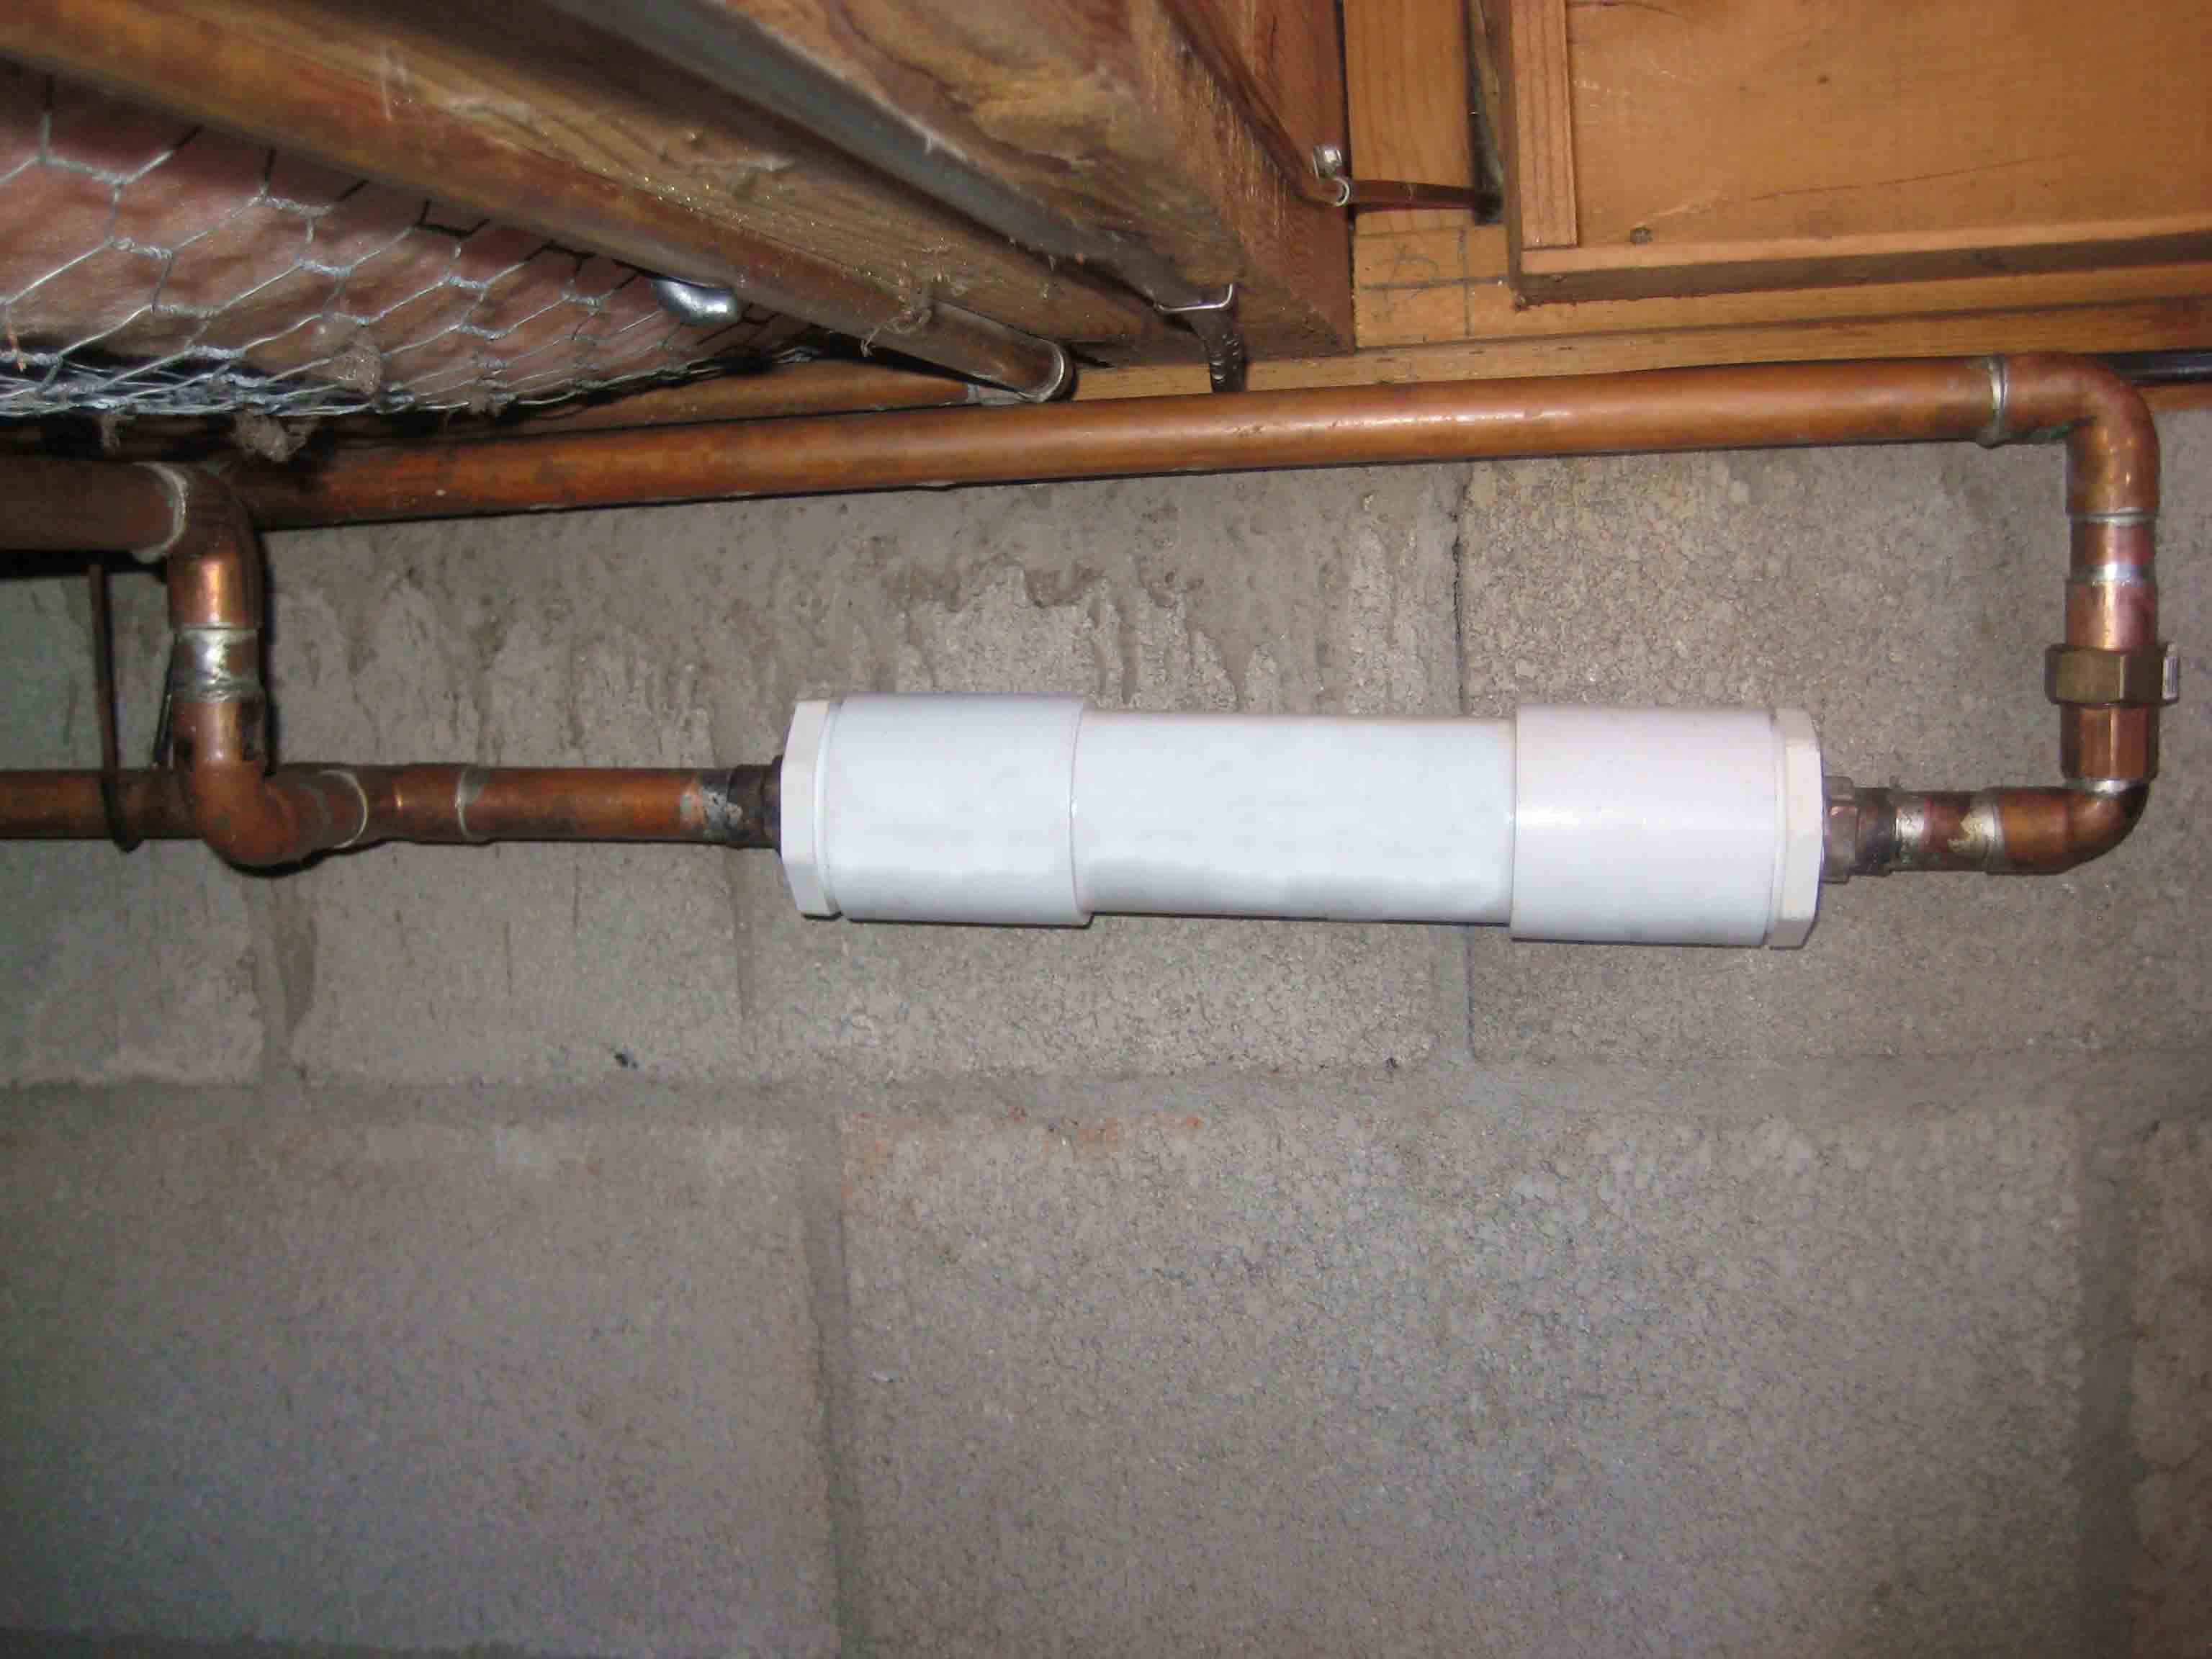
Installing Whole House Structured Water Unit
Licensed professional plumber recommended.
Know where the main water shut off is located before starting.
Know where the main water shut off is located before starting.
NOTE: STRUCTURED WATER UNIT
- Is not designed for extended hot water use above 140 degrees.
- Is not designed to sustain freezing temperatures with residue water inside; function may possibly be deteriorated.
- The Structured Water Unit you received may rattle, this is normal; it contains a geometrically tuned chamber with specific geometric forms that align in the direction of flow.
- The unit is bi-directional.
- Will become brittle and may deteriorate desired function if left exposed to the sun for an extended period of time.
- Locate the water service line entering home and turn off water service line.
- The Whole House Structured Water Unit can be installed vertically or horizontally.
- Open a near by cold water faucet (cold water faucets are generally on the right side of the faucet unit) leave open until water stops flowing to ensure water is completely turned off & to relieve pressure than shut off faucet. Turning off the faucet prevents excess air from entering water lines.
- The unit as shipped may be installed easily on 3/4 inch or 1 inch (specify which size you need when ordering please) diameter copper, PEX, CPVC, or PB tubing using the included SharkBite brass push-fit fittings for an easy installation see diagram.
- Connect the unions on each end of the unit. Measure the full length of the assembled unit with connectors. Subtract 2 inches; this will be the amount to cut and remove from the service water line.
- Measure and mark water service line to length ascertained in step 8.
- Hold the assembled water unit in place where the water line is to be cut to ensure enough space is available; length and depth.
- Using an appropriate cutting tool, cut the pipe to the length determined in step 8.
- Some water will be released when the water line is cut.
- Retain removed water line for later use as a bypass in case the water system is to be moved at a later date.
- If PEX tubing is the service water line, then the tube support liner must be used the support liner is already inserted in the SharkBite connector.
- The tube support liner acts as an internal support for the end of the tubing.
- Ensure that there are no scratches, gouges or any form of damage on the circumference of the tubing 1 in. (25.4 mm) of the cut end. Damage in this area may cause leakage.
- Once the tubing is square and clean, measure 1" and mark the insert depth on the outside of the tubing. This mark is used to ensure that the joint is assembled correctly.
- Unscrew the union connectors on the unit. Check the SharkBite fittings for any signs of damage or foreign objects.
- Push the SharkBite fittings onto ends of the cut tube or pipe. Fitting will grip begore it seals. Ensure that the tubing or pipe is pushed into the fitting until the end is fully seated into the internal tube stop, up to the mark made in step 17.
- Ensure the rubber o'rings are present on both of the 3/4 inch union connections.
- Place the water unit between the union connections and hand tighten the unions (do not over tighten).
- Turn on the water service supply line, ensure there are no leaks, turn on the near by water faucet (from step 6) to purge air out of water line until water runs smoothly & all the burping has stopped then close faucet & check for leaks.
- The water will clean all calcium & aragonite deposits in your water pipes & appliances that use water. So, all existing deposits need to be flushed as much as possible. If they are not, your water maybe milky until this passes.
- Contact an experienced Plumber to drain the sediment in the bottom of your water heater. If you water heater has not been drained periodically the drain valve at the bottom maybe en corroded and may need to be replaced. The water heater may need to be drained weekly until all loosened aragonites are discharged.
SharkBite Information
SharkBite Push-Fittings are the fastest, easiest way to join copper, CPVC or PEX pipe in any combination. With no soldering, clamps, unions or glue. In fact, SharkBite is third-party listed for use with all three pipe materials.
Just insert the pipe and the stainless steel teeth bite down and grip tight, while a specially formulated O-ring compresses to create a perfect seal. Disassembly is just as fast using the simple disconnect tool. So any mistake is simple to fix, and fittings can be easily changed andreused. All fittings can even be rotated after assembly for easier installation in tight spaces.
SharkBites's expanding range of fittings and valves from 3/8" up to 1" make it a truly extensive system, with almost 80 products in the line. And thanks to our high-capacity manufacturing capability, we can promise a fast deliver.
The SharkBite connection system. connects fast. Disconnects fast. And with even more additions on the way, it's growing fast.
Installing Under Sink Structured Water Unit
Know where the main water shut off is located before starting. In case of the possibility of the angle or straight stop valve being defective, the water can still be turned off.
NOTE: STRUCTURED WATER UNIT
Installing Shower Structured Water Unit
- Is not designed for extended hot water use above 140 degrees.
- Is not designed to sustain freezing temperatures with residue water inside; function may possibly be deteriorated.
- The Structured Water Unit you received may rattle, this is normal; it contains a geometrically tuned chamber with specific geometric forms that align in the direction of flow.
- The unit is bi-directional.
- Will become brittle and may deteriorate desired function if left exposed to the sun for an extended period of time.
- Turn off water supply at angle stop or straight stop valve. The cold water supply is normally on the right side under the sink. Release the water pressure by opening the cold water faucet also ensuring water is completely turned off.
- Disconnect riser cold water supply tube from faucet assembly.
- Disconnect the other end from the angle stop valve and set riser aside.
- Connect the two new riser water supply tubes the 1/2 inch FIP inlet/outlet to each end of the Structured Water Unit and hand tighten plus 1/4 turn.
- Route the whole new unit as to allow easy connections to the faucet assembly and the angle stop valve, check clearance to mount the unit to the back or wide wall fo the sink cabinet using gray plastic strap and screws provided.
- Connect the other end of the 20 inch riser water supply tube to the cold water faucet and securely hand tighten plus 1/4 turn. Use pipe thread seal tape on the faucet threads if available.
- Connect the other end of the 12 inch riser water supply tube to the angle or straight stop valve, this is a 3/8 inch OD connector and hand tighten plus 1/4 turn to prevent leaks. use pipe thread seal tape on valve threads if available.
- Turn on the water supply, ensure there are no leaks, turn off the water faucet and again ensure there are no leaks under the sink.
- When you run the cold water through the unit allow the water to run a few seconds before utilizing it to allow for a full activation.
Installing Shower Structured Water Unit
NOTE: STRUCTURED WATER UNIT
- Is not designed for extended hot water use above 140 degrees.
- Is not designed to sustain freezing temperatures with residue water inside; function may possibly be deteriorated.
- The Structured Water Unit you received may rattle, this is normal; it contains a geometrically tuned chamber with specific geometric forms that align in the direction of flow.
- The unit is bi-directional.
- Will become brittle and may deteriorate desired function if left exposed to the sun for an extended period of time.
- Remove shower disperser head.
- Install removed shower disperser head on to the units 1/2 inch male pipe threaded end.
- Install the shower unit to1/2 inch shower arm pipe where shower disperser head was originally removed from. Be aware of possible cross threading , unit should start on threads easily when it is lined up.
- 9. If shower head is too low it may be necessary to purchase an extension shower arm or adjustable shower adapter. A 10 inch shower arm riser is available for purchase from us.
- If a 10 inch riser shower arm is used follow the same procedures installing the Structured Water Unit between the adapter and the shower disperser head.
To learn more about Natural Action Structured Water Units, please visit our Store.